The Kanshudo complete guide to writing Japanese
Kanshudo's guide to writing Japanese
In this guide you'll learn the standard strokes used to draw all Japanese kanji,
how to determine the stroke order for a kanji, the differences between printed and handwritten forms of kanji
and more! In addition there are plenty of links to our kanji drawing practice tool so you can perfect
your own writing style.
Contents
One of the most common questions we hear is 'why learn to write kanji?'. After all, computers and smartphones are
nearly universal, and make it extremely easy to draw any character you need to. Even if you have to create a handwritten note,
it's easy to use a device to look up the kanji first if you need to.
Our answer is very simple: learning to write kanji will cement them in your memory more effectively
than any other approach. If you can actually summon to mind the components of a kanji, and reproduce them on paper by hand, we
can pretty much guarantee that you will not forget that kanji. Purely recognition-based approaches are a great first step,
and they are fast and effective, but writing invokes 'muscle memory' - it uses an entirely different part of your brain, which
then works in tandem to complement the part of your brain that handles recognition. In the same way that
speaking Japanese also improves your listening skills, learning to write will help you to read.
Learning a language effectively (and efficiently) needs a holistic approach - you have to work on
reading, listening, speaking and writing in parallel. Learning to write will help you master the kanji, and Japanese,
more quickly and effectively.
The good news is that all kanji, even the incredibly complex ones, are
actually just combinations of the same set of standard strokes. If you learn and practice each of these
basic strokes by writing simpler kanji that use them,
you will soon start to see how more complex kanji are built up. In turn that will enable you
to see how to draw any kanji.
What is a stroke, and why does it matter?
By 'stroke' (
てんかく
),
we mean a single stroke of a pen or brush. In other words, to draw a stroke, you put your pen down
and begin drawing, and when you lift it up that stroke is complete. Of course, you could draw any kanji by
just copying the shape. But over thousands of years, the art of Japanese calligraphy or
しょどう
has evolved
a standardized way of drawing every kanji, optimized partly to aid memorization, partly for speed of writing,
partly for attractiveness of the end result,
and partly based on how well it can be simplified in handwritten form.The standard strokes
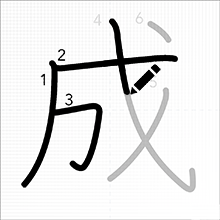
The list below shows the 23 strokes that make up all Jōyō kanji, along with example kanji that use them.
Each example is linked to the drawing practice page for that kanji
(see Section 6 for information on how to use the drawing practice tool).
The dots indicate where you start drawing the strokes.


Some 'gotchas'
In general strokes that appear the same are drawn the same way whenever they are used. However, there are exceptions.
For example, the short stroke that appears on the top left of 牛 (cow) is usually written from
top to bottom, but is occasionally written from bottom to top, for example as it is used in the lower part of 扌
(the component form of 手, hand).
How standard is standard?
There is actually no completely standardized
definition of the different strokes in use, and as a result there is no agreed count of the number of possible strokes.
Many strokes are written in slightly different ways in different kanji, and some scholars consider these variations
of a single stroke type, where others consider them different strokes. However, this debate is not too important,
and you will soon come to recognize the distinguishing features that enable you to separate one kanji from another.
As a beginner it can seem almost impossible to find some kanji at first, and only later do you
discover that you were 'drawing it wrongly', and as a result had miscounted the number of strokes.
However, the good news is that the vast majority of kanji can be broken down into the correct strokes
in the correct order using a few simple rules. Here they are! As with all rules worth their salt, every one of these
has exceptions, but these rules will work 90% or more of the time.
1. Start horizontal strokes first (from the left) then vertical strokes (from the top)
Horizontal strokes are drawn left to right, and vertical strokes are drawn top to bottom. Diagonal strokes almost always
start at the top. Generally, horizontal strokes are drawn before vertical strokes (although rule 3 leads to exceptions).
2. Draw strokes that start at the top left first, and work towards the bottom right
Choose strokes with starting points nearest the top left first. When two or more strokes start at the same point,
choose the ones that go towards the bottom left before ones that go towards the bottom right (so that you end
in the bottom right). There are two exceptions to this rule: (a) strokes which span the whole kanji, crossing other strokes, which
are usually drawn last in their component (see rule 5), as in the top of 書, and (b) dots and other minor strokes,
which are typically drawn last of all, as in the dot in 玉.
3. Draw elements that give vertical symmetry before symmetrical elements
Kanji often contain vertical strokes that provide vertical symmetry, and then multiple similar elements on either side.
Draw the vertical strokes first, followed by the symmetrical elements (left to right), as in 木 or 水. However,
when there are multiple groups of symmetrical elements, the first group is drawn, then the vertical
stroke, then the next group (as in 来).
4. Watch for combined horizontal / vertical strokes
As you can see from the standard strokes list, some stroke types are created by combining other simpler strokes.
It is possible to create some shapes using different combinations of standard strokes, and
this is the most common source of 'stroke counting' problems. Unfortunately, this is a bit irregular. However, a good
guideline is that a horizontal followed by a vertical is generally combined - as in 日.
If that combination is not possible,
a vertical followed by a horizontal might be combined - as in 断.
Sometimes (but rarely enough it's easy to spot), more than
two strokes may be combined, as in 凸凹.
5. Draw components separately, starting with the ones 'inside' or on the top left
As you will know if you are following the
Kanshudo method of learning kanji, most kanji are composed of two or more
components. In general, identify these components, and draw them in order following the same rules as you would as if each
component was a stroke: top to bottom, left to right.
Some components 'contain' other components, and they need to be handled a little differently.
In the case of ⻌ (the move radical), the components it 'contains' are always drawn first.
In the case of 囗 (box, enclosure), you draw the top and sides first, then the component inside, then the bottom.
This approach also applies to other components such as 匚.
Worked example: 鬱
Given the rules above, let's take a look at one of the most complex kanji out there - the kanji with the most
strokes in the Jōyō (29): 鬱.
- First let's see what components 鬱 contains. It is pretty complicated! It has several: 缶, 林 (or 木 on either side), 冖, a complex piece 鬯 which in itself could be made up of other elements, and finally 彡.
- So, let's start with rule 5 to help us figure out the order of components to draw: symmetry first (缶), then the 木 on either side, then another symmetrical component 冖, then the left side 鬯 and 彡. None of these are 'containing' components, so we can just draw each one by one. This is already looking more straightforward!
- Let's take 缶. This is mostly straightforward: we start with rule 2 which shows us we start at the top left with our little diagonal stroke. Rule 1 then tells us to do the two horizontals, followed by the vertical. Now things get tricky: in fact the bottom of this component is only two strokes, a 'shelf' and another vertical.
- Next we draw our two trees. Rule 1 tells that we do our horizontal first, followed by the vertical. Rule two tells us to do the left diagonal followed by the right diagonal.
- Next we have 冖: there are actually two challenges here - we draw the left side vertical first, and then the horizontal and the right vertical as a combined element.
- Next we go to 鬯. This is actually a radical (standard component) in Chinese, which uses a longer radical list than Japanese. However, in Japanese it is extremely uncommon. Stroke order is fairly standard, though, if you remember to apply rule 3 several times, as that shows you how to decide what orde to do the strokes in the brush.
- And 彡 is a nice easy one to finish: rule 1 tells us we draw our strokes top to bottom, and each stroke starts at the top.
Hiragana and katakana began their existence as kanji, and so generally speaking they follow
similar rules.
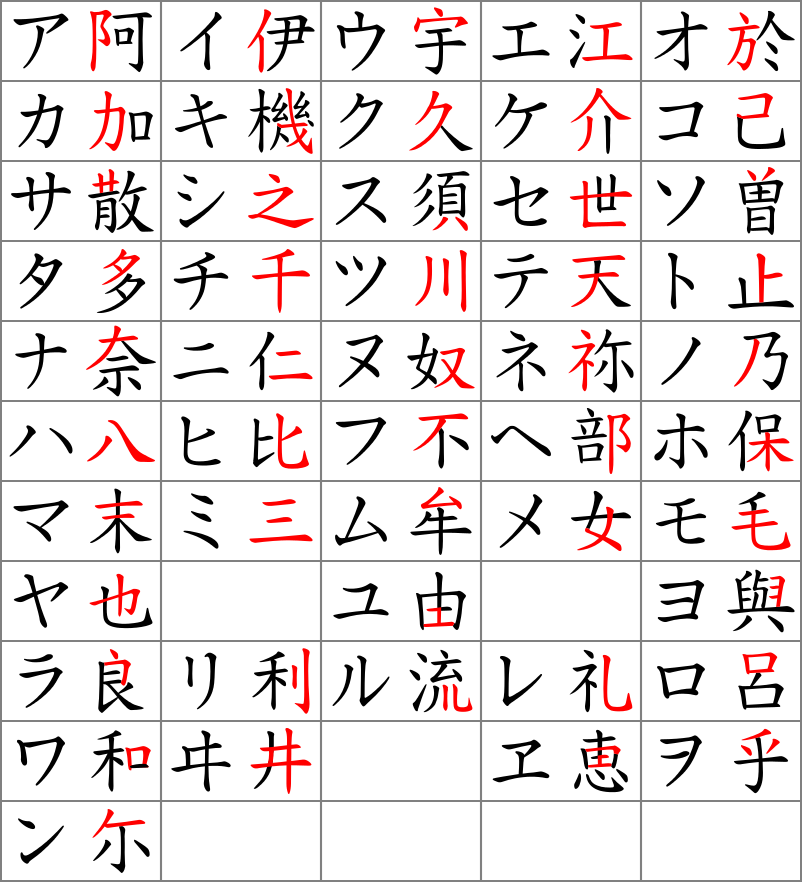
Image source:
Wikipedia
Katakana characters in particular were created by taking elements of kanji - for example, katakana
カ originally came from 加, and the stroke order is unchanged.
However, hiragana
characters were created as simplifications of the kanji they derive from. For example, although hiragana か was also
derived from 加, the 口 on the right remains, but simplified to a single dash. This simplification changes stroke types
and sometimes order away from the original.
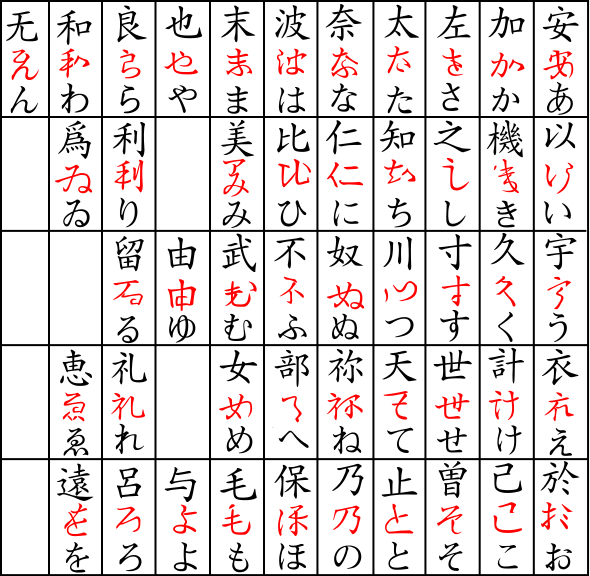
Image source:
Wikipedia
As you can see from the chart illustrating the origin of hiragana above, handwritten Japanese characters
can bear little obvious relation to their typeset equivalents!
While
かいしょ
presents every stroke clearly and independently, the cursive form of Japanese arises from the same sort of
mechanism as cursive writing of the English alphabet - the desire to avoid lifting the pen (or in the case of
Japanese, the brush)
off the page.
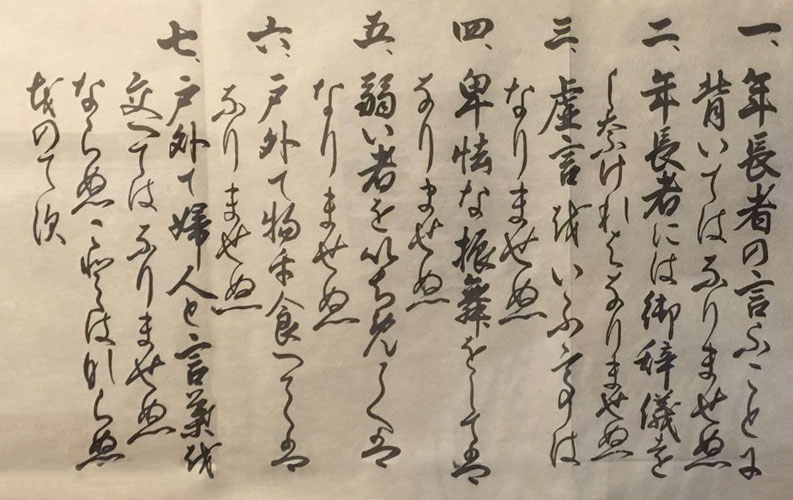
For non-native Japanese learners, fully cursive writing, known as
そうしょ
or 'rough script' ('rough' is
from the original meaning
of 草, which means 'grass' in modern Japanese), presents tremendous difficulty, because it
requires you to know a kanji well enough to be able to recognize and differentiate only a few salient
characteristics.
For example, the following is a rendition of the following poem:
癸卯参月 在蘇之雲隠山房 雨窓無事. As with all Japanese writing, start from the top right of the image and work in columns.
The first column - the farthest to the right - contains just two characters: 癸 and 卯.
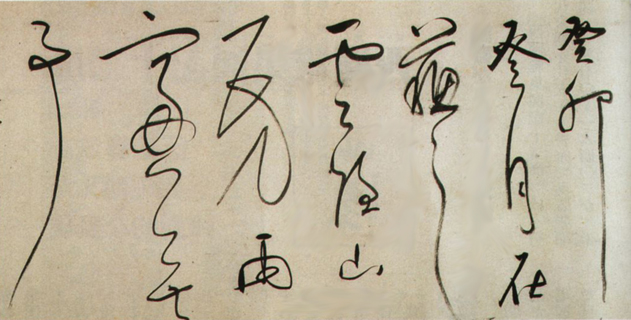
Source: 草書体
Source: Wikipedia
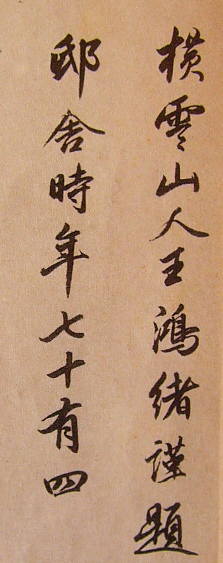
Most Japanese write kanji on a daily basis in an intermediate semi-cursive form known as
ぎょうしょ
. This form is much more
approachable
for learners, as most of the strokes of the original are still present. It's even possible to get hold of
行書 fonts (see further reading #3)!
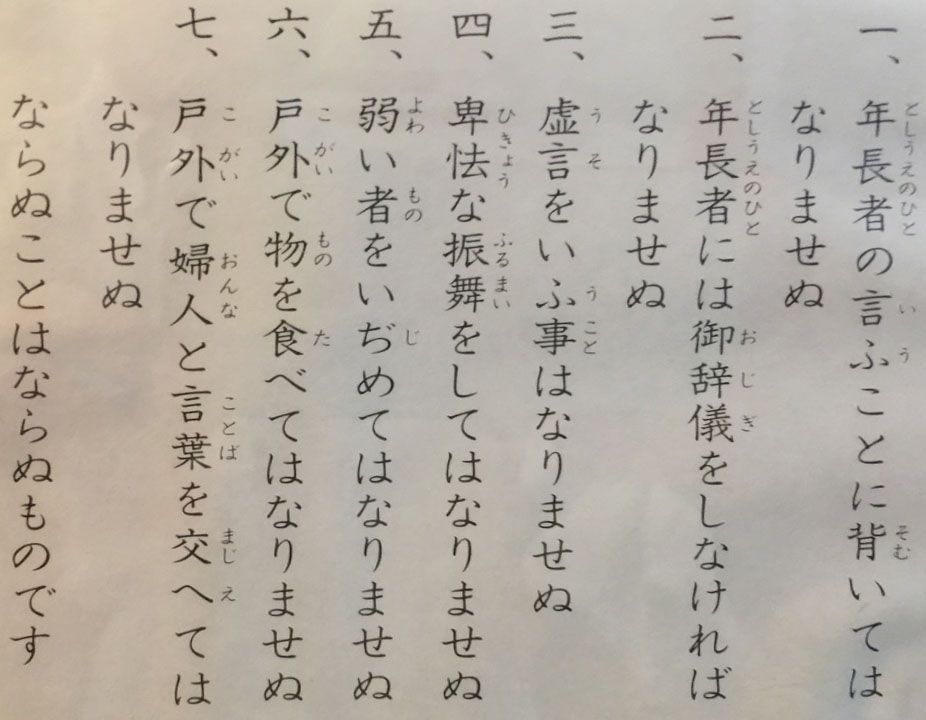
In this example, it's much easier to make out the original characters, although still not
trivial.
This one says 横雪山人王鴻緒謹題 邸舎時年七十有四.
Source: poster on onsen wall in Nakanosawa, near Inawashiro Machi (via Larry Richards)
Learning to read cursive Japanese
Unfortunately, there is no magic path to this! The only real solution is lots of practice. You need
to know components well enough that you can recognize them from the 'suggestions' in the handwritten forms, and then
you know need to know the kanji well enough that you can bring to mind various kanji that use components you can recognize.
All this is greatly complicated by the fact that handwritten Japanese may draw on a much larger range of kanji than the Jōyō.
But, fear not! Reading handwritten Japanese is a rare requirement as a beginner, and if you are stuck, there are plenty of
tools to help - see ref. (4) for some pointers.
To practice drawing hiragana, katakana, or the most common components, we've created the Drawing Practice Center enabling you to access everything in one place.
Additionally, you can use Kanshudo to practice drawing any kanji or component you find anywhere on Kanshudo.
Our practice tool lets you draw independently, or superimpose your drawing on a reference image of the kanji for comparison.
To practice drawing a kanji, first look it up, for example using
Quick Search. Scroll down to the blue 'cascading kanji' view
of each kanji and its components. Click on the kanji for more details, and click on the
DRAW link to bring up the drawing practice tool. You can also find a link to
drawing practice from the details page of any kanji - for example 漢 details.
If you subscribe to the Daily Kanji, your daily email will also contain a direct link
to drawing practice.
Once you're in the drawing tool, just start drawing! Use the example on the left as a reference.
At any time you can click Show reference to see the same example superimposed on the drawing grid. Clear my drawing
will reset your drawing. Clear last stroke just removes one stroke at a time. The reset button
will clear all your strokes as well as the
reference image.
When you are ready, play a few rounds of Kanji Draw, our kanji drawing game. You can play Kanji Draw with any kanji study set, kanji with any usefulness level (or range of levels). You can also restrict Kanji Draw based on your own kanji mastery level. Play a game in high score mode and track your progress!
Kanji Draw is also available as part of Beginner lessons, Intermediate lessons, the Textbook Companion. You can also practice drawing kanji for kanji cards in any flashcard set (from the details page for the set).
- There are many analyses of Chinese character strokes. One sensible reference point is the Unicode specification, which defines a 'block' of characters representing strokes. Currently 36 strokes are included, but if you examine the list you will see several which are extremely similar - for example, Unicode defines a separate character for a short diagonal stroke depending on whether it goes from left to right or right to left. See https://en.wikipedia.org/wiki/Stroke_(CJKV_character).
- For more on Japanese calligraphy, start with Wikipedia's article on the different scripts: https://en.wikipedia.org/wiki/Cursive_script_(East_Asia).
- See here for an example of fonts that produce cursive Japanese.
- One great tool is Mojizo, a system for recognizing cursive kanji from images. Kanshudo's own component builder (how to guide) is a way to find kanji quickly based on any components you recognize, and it includes our own AI tool for recognizing hand-drawn components.
Kanshudo is your AI Japanese tutor, and your constant companion on the road to mastery of the Japanese language.
To get started learning Japanese, just follow the study recommendations on your Dashboard.
You can use Quick search (accessible using the icon at the top of every page) to look up any Japanese word, kanji or grammar point, as well as to find anything on Kanshudo quickly.
For an overview, take the tour.